


This is how I get mine done:
1- start with your base image (you can choose to fill it with the paint bucket now or later)
1- start with your base image (you can choose to fill it with the paint bucket now or later)

2-now create another layer, which is in the lower right corner of your work history station pictured here

3-in your new transparent layer, color in the mane using at least 3 different colors minimum (light, medium, dark) and don't worry about coloring out of line...because it's a different layer we can erase the mistakes later without altering the base image. You can see I've chosen a palette of 5 colors to use in my mane tutorial at the top of my image.

add in your other colors where you would like them...

4-now set your brush up...in my brush collection I chose the standard "Asorted Brushes" that come with Adobe Photoshop CS and pick the one that looks like a little triangle with three dots. Now set up your strength and brush size, here is what I set mine on:

5- start pulling your strokes in a fluid sweeping motion (again don't worry about going out of line as this is the separate layer and we can erase what we don't want or need later) continue till you have the forelock done as well, don't do the crest yet

6-now on the crestline...the reason I have the lighter color stripes up top is because I drag my brush down, which pulls that light color down and creates an effect of shining light.

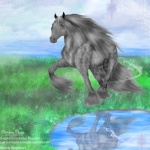
7-Now we need to clean up our work! The easiest way is to lower the opacity of the secondary layer (NOT the base image) To do this, be sure you are on the right layer(you can see mine is highlighted by the darkish green color) and there is a little slide you see called opacity...drag the slide down to lower the opacity as much as you would like to see the base image underneath, and then use your eraser...zoom in for better accuracy...and clean up your work with ease...then change your opacity for the layer back up to 100% and POOF! Finito! Save your image as either gif, png, jpeg and show everyone your completed work!


add in your other colors where you would like them...
4-now set your brush up...in my brush collection I chose the standard "Asorted Brushes" that come with Adobe Photoshop CS and pick the one that looks like a little triangle with three dots. Now set up your strength and brush size, here is what I set mine on:
5- start pulling your strokes in a fluid sweeping motion (again don't worry about going out of line as this is the separate layer and we can erase what we don't want or need later) continue till you have the forelock done as well, don't do the crest yet
6-now on the crestline...the reason I have the lighter color stripes up top is because I drag my brush down, which pulls that light color down and creates an effect of shining light.
7-Now we need to clean up our work! The easiest way is to lower the opacity of the secondary layer (NOT the base image) To do this, be sure you are on the right layer(you can see mine is highlighted by the darkish green color) and there is a little slide you see called opacity...drag the slide down to lower the opacity as much as you would like to see the base image underneath, and then use your eraser...zoom in for better accuracy...and clean up your work with ease...then change your opacity for the layer back up to 100% and POOF! Finito! Save your image as either gif, png, jpeg and show everyone your completed work!


 lol
lol


